So you’ve decided to start an online store, have at least one product, and are excited to start selling. Your product might look great sitting in your bedroom or home office, but how can you make sure it really stands out in the era of Instagram filters?
Don’t sweat it. You don’t have to be a professional photographer to take attention-grabbing photos of your products. In this article, you’ll learn, step by step, how to do phone product photography using natural light and a good product photo app.
6 steps to master phone product photography
- Use a room with good lighting
- Choose your smartphone
- Get a mini tripod
- Set up your backdrop
- Use white bounce boards
- Set up a diffuser sheet if the sun is too bright
Most ecommerce store owners know the basics of phone product photography: Find a white background and some natural light, choose the highest quality setting and resolution possible on your phone—and click! You have a product photo. This is a great start.
But there are a few extra tools and accessories that can greatly enhance your photos and demonstrate the value of your product to let shoppers envision it in their lives.
If you want to become a professional photographer with your smartphone and take amazing product shots, here’s how to build your setup.
1. Use a room with good lighting
First, find a room in your home with a well-lit window. The bigger the window, the more natural light you’ll have for bringing your product to life.
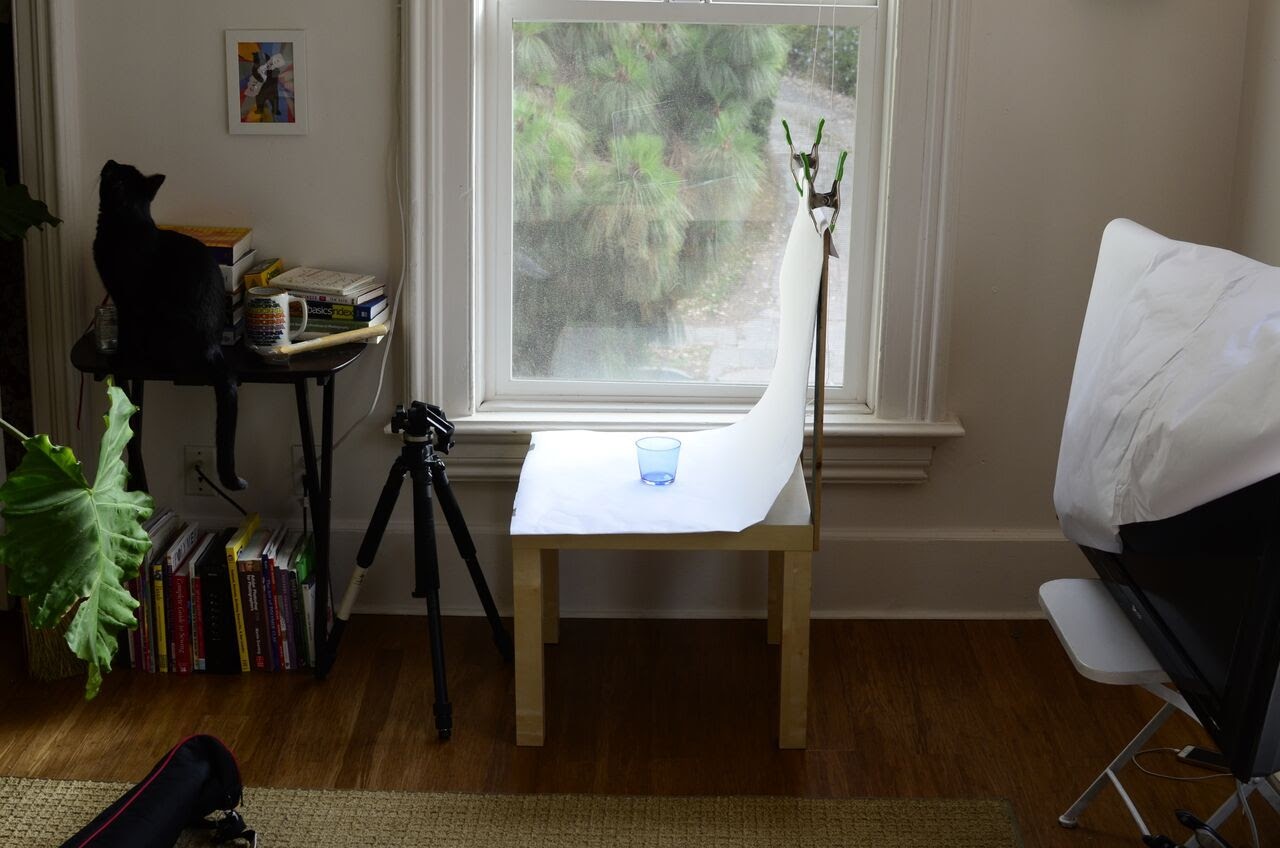
Taking product photos closer to the window creates a softer light with darker shadows. Being farther away from the light source will give you lighter, shaper shadows.
2. Choose your smartphone
Most smartphone cameras these days make great DSLR alternatives for product photography. The higher the megapixel count, the better your phone product photography will come out.
You can use any smartphone with a good camera, but aim to get your hands on a newer model with a 12 megapixel camera or more.
3. Get a mini tripod
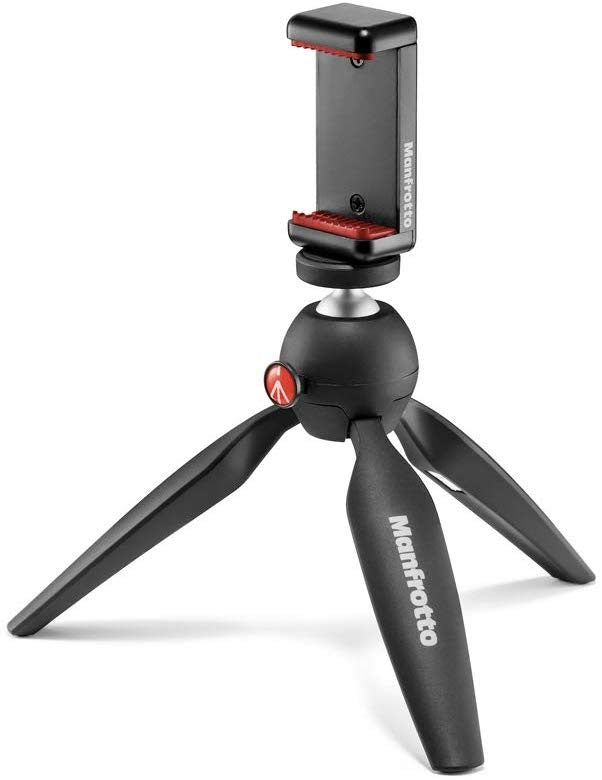
Mini tripods range from inexpensive to pricey, but no matter your budget, they’re a good investment with a high payoff. A mini tripod will reduce camera shake and help standardize photo angles and style for your product line.
If you want a simple mini tripod, consider the Manfrotto Pixi mini tripod kit. It’s great for beginners, it holds your phone in place, and it can be placed on your sweep for easily capturing high-quality product pics.
4. Set up your backdrop
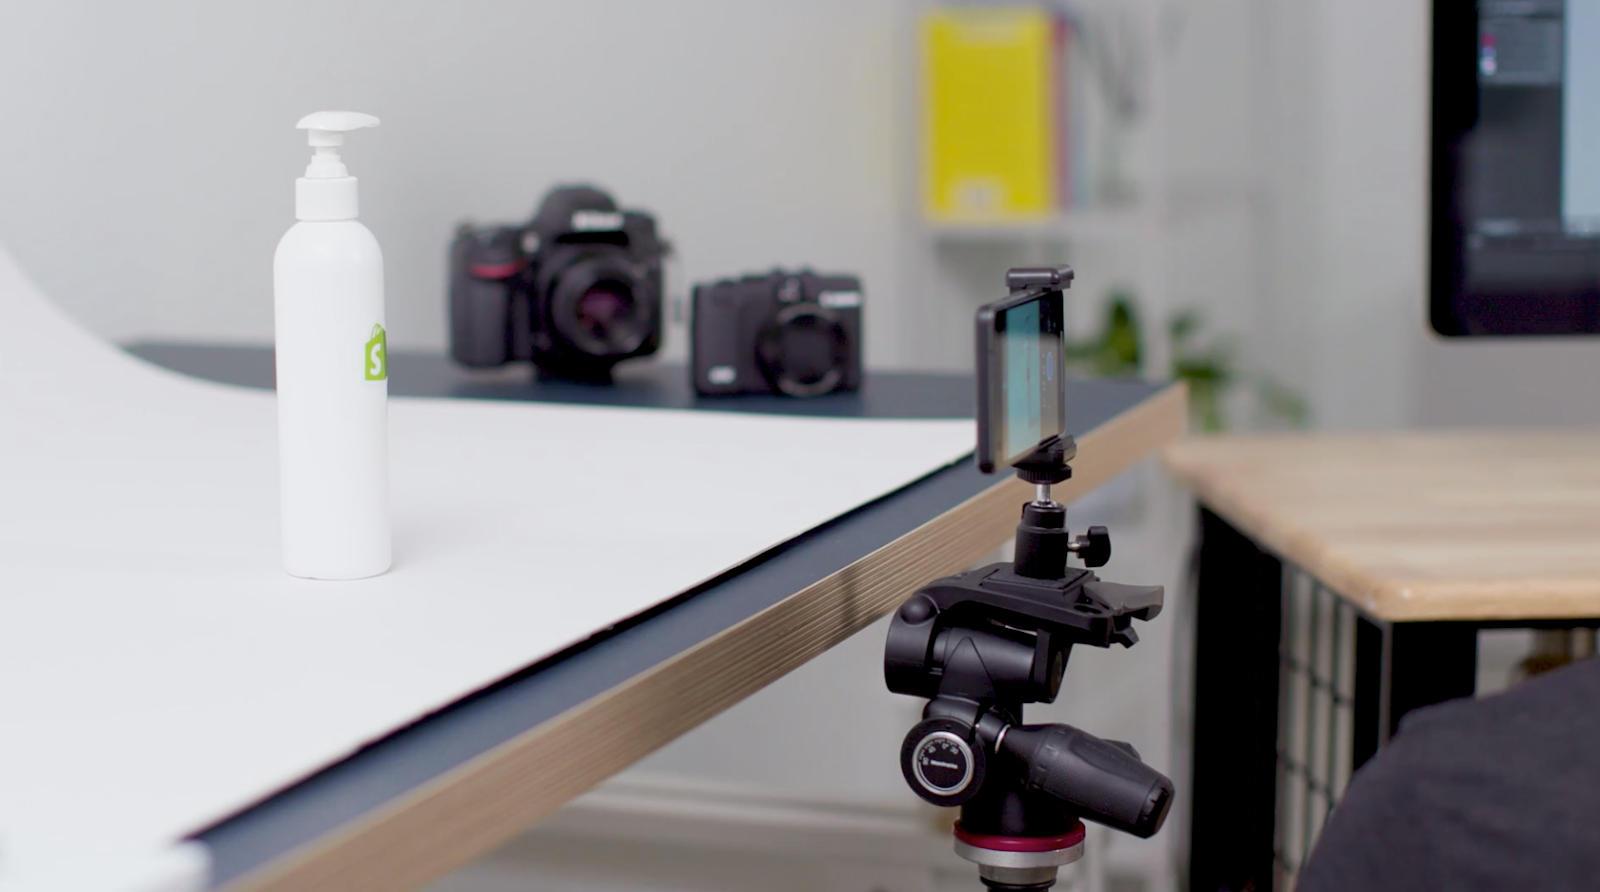
Place your white backdrop behind your product to give your photographs a clean and consistent look and to eliminate distractions. You could use a white paper sweep or buy inexpensive poster board from your local drug store or art shop. You’ll also need a table to place your backdrop on.
You can use tape or Sticky Tack to hold your backdrop down or stick your product to the backdrop.
Always keep your backdrop white. A white backdrop reflects natural light onto the product and gives you an evenly lit photo. It also makes the editing process easier if you need to remove the background. A cream or off-white color will make editing and lighting difficult. Also, try to position your backdrop not only behind your product but underneath it as well.
5. Use white bounce boards
Controlling the lighting is key when learning how to take product photos with an iPhone or Android device. Bounce boards help minimize strong shadows and create a more balanced lighting environment to bring out the finest details of your product. You can buy a white bounce board made of foam on Amazon.
6. Set up a diffuser sheet if the sun is too bright
Diffuser sheets soften harsh light. Find them on Amazon, or make one at home with parchment paper, a frosted shower curtain, or printer paper.
How to use natural lighting for product photography
Get photography lighting right, and you’ll have some amazing product images on your hands. Get it wrong and no amount of image retouching will save your photos.
There are three key tips that are crucial for getting the best images from your photoshoot.
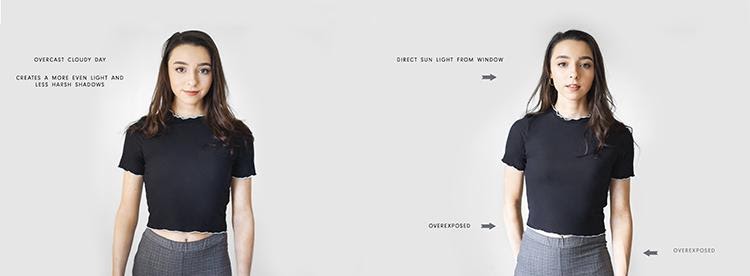
1.Shoot in a well-lit room. Natural light through a window is a better option than artificial light from a photo studio. First, you probably have access to a window (and it’s free). Second, the light comes from a single direction, which generates natural shadows and adds texture to your products.Consider the weather: Is it sunny or cloudy? To get the look you’re going for, you may prefer a little overcast versus full sunlight. As you’ll see in the example below, it can make a big difference on the shadows and highlights on your photo.
2. Place your setup close to the window. Aim for 90 degrees to the right or left of your setup. Plan to start your photoshoot at the brightest time of day. If the sun is too bright, you can always use a diffuser sheet to soften the light.
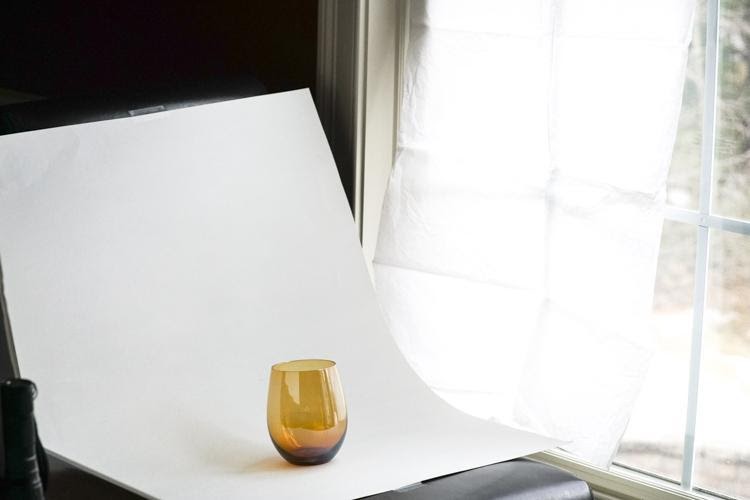
Whatever you do, avoid hard light at all costs, as it can make colors look saturated and will highlight the tiniest flaws in your product—things people normally can’t see with the naked eye.
3. Control natural light with foam boards and reflectors. Sometimes the sun will suddenly disappear behind the clouds mid-shoot. If that happens, don’t worry, use your foam boards to bounce and intensify the light to fill shadows.
If you’re using a reflector, you can manipulate the light on your product by moving the reflector closer or further away. This will help reflect natural light from the sun back onto the product.
Remember to test different angles with the reflector to find the right balance between shadows and lighting.
Best camera angles for product photography
When you’re taking product photos for your ecommerce website, some angles work better than others. Offering different perspectives of your product to a shopper can also help answer any questions they have that your product descriptions don’t explain.
Give as many different viewpoints as possible to highlight key features of your product. An all-around view is engaging and can help shoppers envision themselves wearing or using your product, which can lead to more sales.
It’s also important to include close-up shots of your products. Close-ups let you capture features that showcase the quality of your product—print detail, fabric, texture, or usage details—and highlight specific elements shoppers would inspect in a retail store.
Whether you’re shooting clothing photography , footwear, or something else, there are the five camera angles you should test in your photo shoot:
- Eye level. This view shows the product as you’d see it looking straight on.
- High angle.This view shows the product as if you’re looking down at it from an angle.
- Low angle. This view shows the product as if you’re looking up at it from the floor.
- Bird’s eye. This view shows the product as if you’re standing over it.
- Slanted. This view shows the product from one side.

If you’re new to phone product photography, it’s recommended you keep your smartphone and tripod in the same spot during the shoot and rotate your product to change the angle you want for your image. When you rotate the product versus the camera, your final shots will all be framed the same, plus, you’ll ensure consistency and reduce image editing after the shoot.
How to shoot phone product photography
Now that you have all your gear set up and understand the different camera angles and lighting, it’s time to shoot some photos.
Before you start, use the following checklist to make sure your Android or iPhone camera is ready to shoot.
- Prepare your phone. Make sure your phone is charged and you have backup storage for your images.
- Set up your white balance. To set the white balance according to the light temperature in your setup, touch the WB button, then touch the white background.
- Check your exposure. Tap the circular Exposure button, then touch your product so the camera knows to expose it.
- Keep everything in focus. Touch the circular Focus button, then touch your product so the camera knows to properly focus on the product.
- Make sure you lock your camera settings. After you’re done adjusting these settings, tap each one again to lock the settings in place. This will stop the camera from automatically adjusting the settings while you’re taking shots.
Once you lock your settings, you’re ready to start shooting!
After your first shot, take a look at your image and see if you think it needs to be brightened or darkened to achieve proper exposure. If you think the exposure needs tweaking, touch the +/- button below the circular Focus button and pull the slider up or down to change the exposure.
Common mistakes with phone product photography
Because so many people have smartphones, taking product photos is more accessible than ever before. That also means there are lots of common mistakes. Becoming aware of these pitfalls can help you avoid them.
Remember to avoid the following three common mistakes in phone product photography so you can get the best shots:
- Zooming in. Your phone’s zoom function isn’t actually a great tool to use for product shots. It greatly reduces image quality. If you need a closer shot, it’s better to crop when editing.
- Using the front-facing camera. The front-facing “selfie camera” typically isn’t as good as the back camera. This may vary depending on your phone’s specs. But generally speaking, the rear-facing camera has more megapixels, which leads to higher image quality.
- Turning on the flash. Your phone’s flash will overexpose the photo and mess up the colors. It’s better to use natural lighting and consider the advice outlined above.
Phone product photography trends
Ecommerce is constantly evolving, and this impacts the way you approach product imagery. It’s good to stay apprised of current trends to know what customers are looking for and what makes sense for your brand.
Here are three general product photography trends to keep in mind as you shoot with your smartphone:
- 360-degree photos. Advancements in technology have enabled brands to offer complete 360-degree views of their products. And, though these might appear to function like videos, 360-degree shots are actually a series of multiple still images.
- AI photo editing. AI has helped businesses become more efficient in many areas, including product photography. While you can use AI to remove backgrounds from your phone product shots, it’s still important to carefully check the quality, as these tools can lead to imperfections.
- Product videos. Not necessarily a new trend, rather one that continues to grow, more brands are using product videos. In fact, 89% of people say they want to see more brand videos. Like 360-degree images, videos give shoppers a more complete view of the product. They can also see it in action, quite literally.
How to edit product photos
The idea of editing photos may sound intimidating, but it’s actually really easy with your smartphone.
- Choose a product photography app. Go to the app store on your phone and download an editing app for product photos. Some smartphone photographers prefer mobile apps like Lightroom or Snapseed; others prefer photo editing software for their desktops.
- Open up your editing app. Choose the image you want to prepare for your online store. Most images need a little tweaking to truly make them shine.
- Use the app to make a few basic edits. These include brightness, contrast, sharpness, highlights/shadows, and white balance. Don’t be tempted by filters, borders, tints, and oversaturation. Your goal is to make your product look amazing and make it stand out. Try to make it look as close as possible to what the product looks like in real life.
- Save presets. After you edit your first photo, save the settings as a preset so you can apply the same adjustments to other photos from your shoot. While presets help you save time, make sure to check each image after applying the preset to see if there are any additional tweaks for you to make.
- Apply a white layer background. Remove any blemishes or creases from your background by replacing your background with a white layer. Since you took photos on a white background, it’ll be easy to isolate the product and add a layer.
Once your product image looks clean, crisp, and beautiful, add it to your Shopify store and put your hard work to use!
5 best apps for product photography
Choosing the right editing apps is an important part of mastering product photography with a smartphone. Many come with an in-app editor, but there are plenty of third-party apps that give you everything you need to make your product stand out.
Some of the top-rated product photo app options are:
1. Lightroom
Available for: iOS and Android.
Price: Requires Adobe Creative Cloud subscription, starting at $9.99/month.

Some would say Adobe Lightroom is the best app for product photography on the market. It features easy-to-use tools like sliders and presets to create photos that look exactly how you want them. Lightroom is also a good option if you plan to edit photos on your computer. You can start on mobile, web, or desktop, and when you make edits, they will be automatically applied across devices.
If you want to get the most out of Lightroom, you can sign up for the Adobe Creative Cloud Photography plan, which includes the photo editing app for desktop, mobile, and web, plus the latest version of Photoshop for $9.99 per month.
2. Photoshop Express
Available for: iOS, Android, and Windows.
Price: Requires Adobe Creative Cloud subscription, starting at $9.99/month.
You’ve probably heard of Adobe Photoshop and what it can do. With Photoshop Express, you get all of its great photo editing features right on your smartphone. You can use product photos from your phone or take them inside the app. Then easily adjust the hue, brightness, exposure, and contrast to create amazing photos for your store.
3. Snapseed
Available for: iOS and Android.
Price: Free.

Snapseed is a free photography editing software owned by Google. The app brings the power of a professional computer editor to your phone, with many features to edit images in ways you’ll usually only find in expensive software. Beginner photographers also have more utility with Snapseed using Stacks, which lets you revert your edits to an earlier version and makes it easy to save settings and apply them.
4. VSCO
Available for: iOS and Android.
Price: Free version available; annual paid plans are $29.99 or $59.99.
VSCO has all the basic editing tools such as exposure, contract, color balance, and more, letting you create incredible photos on the go. It’s a great product photo app to enhance images and doubles as an effective Instagram tool with its huge library of filters and endless options to customize your photos.
5. Photon
Available for: iOS.
Price: Free
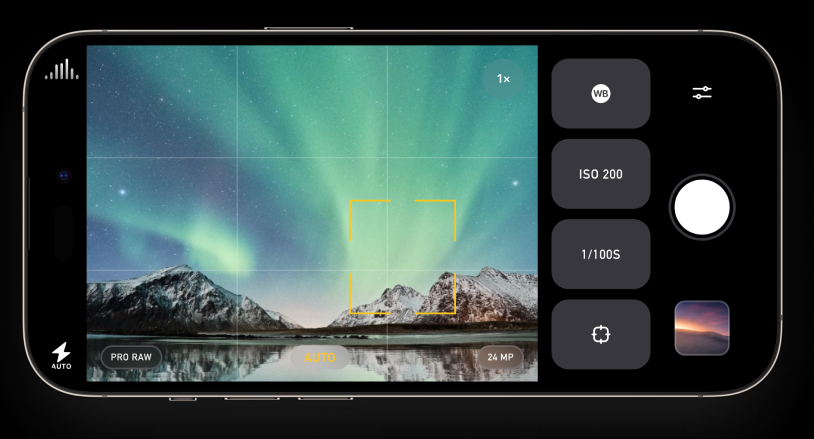
Photon is a great option for both experienced and beginner smartphone photographers. You can use Photon not only as an editor but also as a camera for your product shoots. The product photography app lets you set exposure and focus and includes a stabilizer; It feels like you’re shooting with a high-quality DSLR camera lens.
If you prefer to edit photos on your computer, you can use Photon to capture product photos in RAW. This ensures information or data isn’t compressed and produces higher-quality product images.
Getting the most from your product photography
Learning how to take photos on an iPhone or Android seems hard at first, but after a few times behind the camera, you’ll be a pro. With all of the above info, you’re well on your way to mastering product photography and selling more photos in your store. At some point, you might even consider selling your photography online.
Read more
- How to Start a Dropshipping Business- A Complete Playbook for 2024
- The Ultimate Guide To Dropshipping (2024)
- Clothing Photography- How to Take Beautiful Apparel Photos
- How to Start a Candle Business (with Examples)
- How To Source Products To Sell Online
- How to Sell on Instagram with Instagram Shopping
- How To Write a Return Policy (+ Free Template) (2024)
- The Ultimate Guide to International Ecommerce
- How to Design a Visual Identity for Your Brand- Ideas for Every Budget and Skill Level
- What are Brand Guidelines and How to Create a Style Guide
Phone product photography FAQ
How can I take professional pictures at home with my iPhone?
- Choose an iPhone 13 or newer.
- Test third-party camera apps.
- Use a white background for your setup.
- Place your setup near a window with natural light.
- Hold down the viewfinder to lock focus.
- Avoid zooming in on photos.
- Try different camera angles.
- Use a photo editing app.
How do I take quality product photos?
- Use a smartphone camera with 12 megapixels or more.
- Shoot from a tripod to reduce camera shake.
- Use natural light from a window.
- Bounce light using a foam board to soften shadows.
- Use a sweep or close-up shots to highlight product features.
- Shoot a variety of angles and image sizes.


