Announcing Online Store 2.0
Online Store 2.0 is an end-to-end overhaul of how themes are built at Shopify, launched June 2021. While the information in the following article is still correct, it doesn't account for Online Store 2.0 best practices, and may not include references to recent features or functionality. To learn more about how to build with Online Store 2.0, visit our updated documentation.
Visit docsAs ecommerce becomes ever more popular across the globe, there’s a huge opportunity for developers to provide global clients with internationalized, or translatable themes. If a theme you’re building is flexible enough that clients can change the default language, and can easily edit content, the market for that theme can grow exponentially.
More than half of the world’s websites are in English, but only about 25 percent of web users are English speakers. This means there’s a huge role for developers to build localized websites, and since there are merchants in 175 different countries using Shopify, developers working with Liquid are well positioned to help international clients get their businesses up and running in their preferred language.
"Developers working with Liquid are well positioned to help international clients get their businesses up and running in their preferred language."
By using Liquid’s translation keys and filter, it’s possible to include ready-made translations or empower clients to use the Language Editor to translate their storefront content into different languages. Storefront content like buttons, links, and placeholders can have “pre-loaded” translated copy, which means clients can choose their preferred default language quickly and easily.
In this article, we’ll be looking at how you can use Liquid to allow clients to display different languages on their online store , as well as exploring best practices around naming conventions for translation keys.
What are translation keys and filters?
A translation key is an object which is used where text would appear on a Shopify storefront. This could include the placeholder text on a newsletter form, or the submit text on an add to cart button. Translation keys will have corresponding values for each of the available languages, and these translations are stored in individual locale files, within the theme itself.
The translation (or t) Liquid filter accesses and outputs the translation of a key, for the store’s active language. When a translation key is passed through a t filter, the corresponding value for the translation key is located within the correct locale file and outputted.
When creating translation keys, you must remember to always wrap the key in single quotes. For example a translation key for text on an add to cart button could look like products.product.add_to_cart.
Ensuring your theme is internationalized by using translation keys instead of hard-coded text is also a requirement when submitting themes to be sold in the Shopify Theme Store.
You Might Also Like: Understanding hreflang Tags for Multilingual Stores.
Keeping it local
The locale file stores values for translation keys and an individual locale file is created for each language on your store. A locale file organizes the values for translation keys within JSON arrays, and multiple locale files can be saved in the Locales directory of your theme.
Each set of translations are organized by category, depending on where the text would appear. The “general” category would apply to elements like breadcrumbs, and the “blogs” category would apply to elements like article comments. This structure also reflects how the translation keys are titled, and we’ll be looking at naming conventions later in this article.
Values within locale files can contain HTML and Liquid objects, although it’s advised to limit these to what is essential for your clients. A locale file is created simply by adding a .json file to the Locales folder in your themes directory.
When naming new locale files, you must follow the standard IETF language tag nomenclature, where the first lowercase letter code represents the language, and the second uppercase code represents the region, for example:
- fr-CA.json for French - Canada
- en-GB.json for English - Great-Britain
- es-ES.json for Spanish - Spain
When naming your locale files, you must designate a default locale file, in the format of *.default.json. If for example, you wanted the default language to be French, you would name your French locale file fr.default.json.
Find your new favorite Markdown editor in our roundup.
Translation in action
To see a working example of this internationalization process in practice, the text for a product‘s add to cart button could be set up like this:
<button>


<span {{ 'products.product.add_to_cart' | t }} </span>


</button>
In this case, 'products.product.add_to_cart' is the translation key. and t is the translation filter. The corresponding value for 'products.product.add_to_cart' is retrieved from the locale file of the current active language, and this value is outputted as the text on the add to cart button.
As we noted, Locale files store the values which will be outputted in place of the translation keys and there’s a different locale file for each available language on your store.
So, for example, if your theme offers English, French, and Spanish as options for active languages, you’ll need a corresponding value for 'products.product.add_to_cart'.
locales/en.default.json (English):
"products": {


"product": {


"add_to_cart": "Add to cart"


}
locales/fr.json (French):
"products": {


"product": {


"add_to_cart": "Ajouter au panier"


}
locales/es.json (Spanish):
"products": {


"product": {


"add_to_cart": "Agregar al carrito"


}
 Now when a customer has selected “French” as their store’s active language, a buyer will see the following when they land on a product page:

Please note, using these techniques will not allow customers to choose their preferred language when visiting a store. Rather, this allows merchants to choose one default language that their theme is displayed in. If your client does require a multilingual store, there are a number of apps in our app store which can achieve this effect.
Editing languages
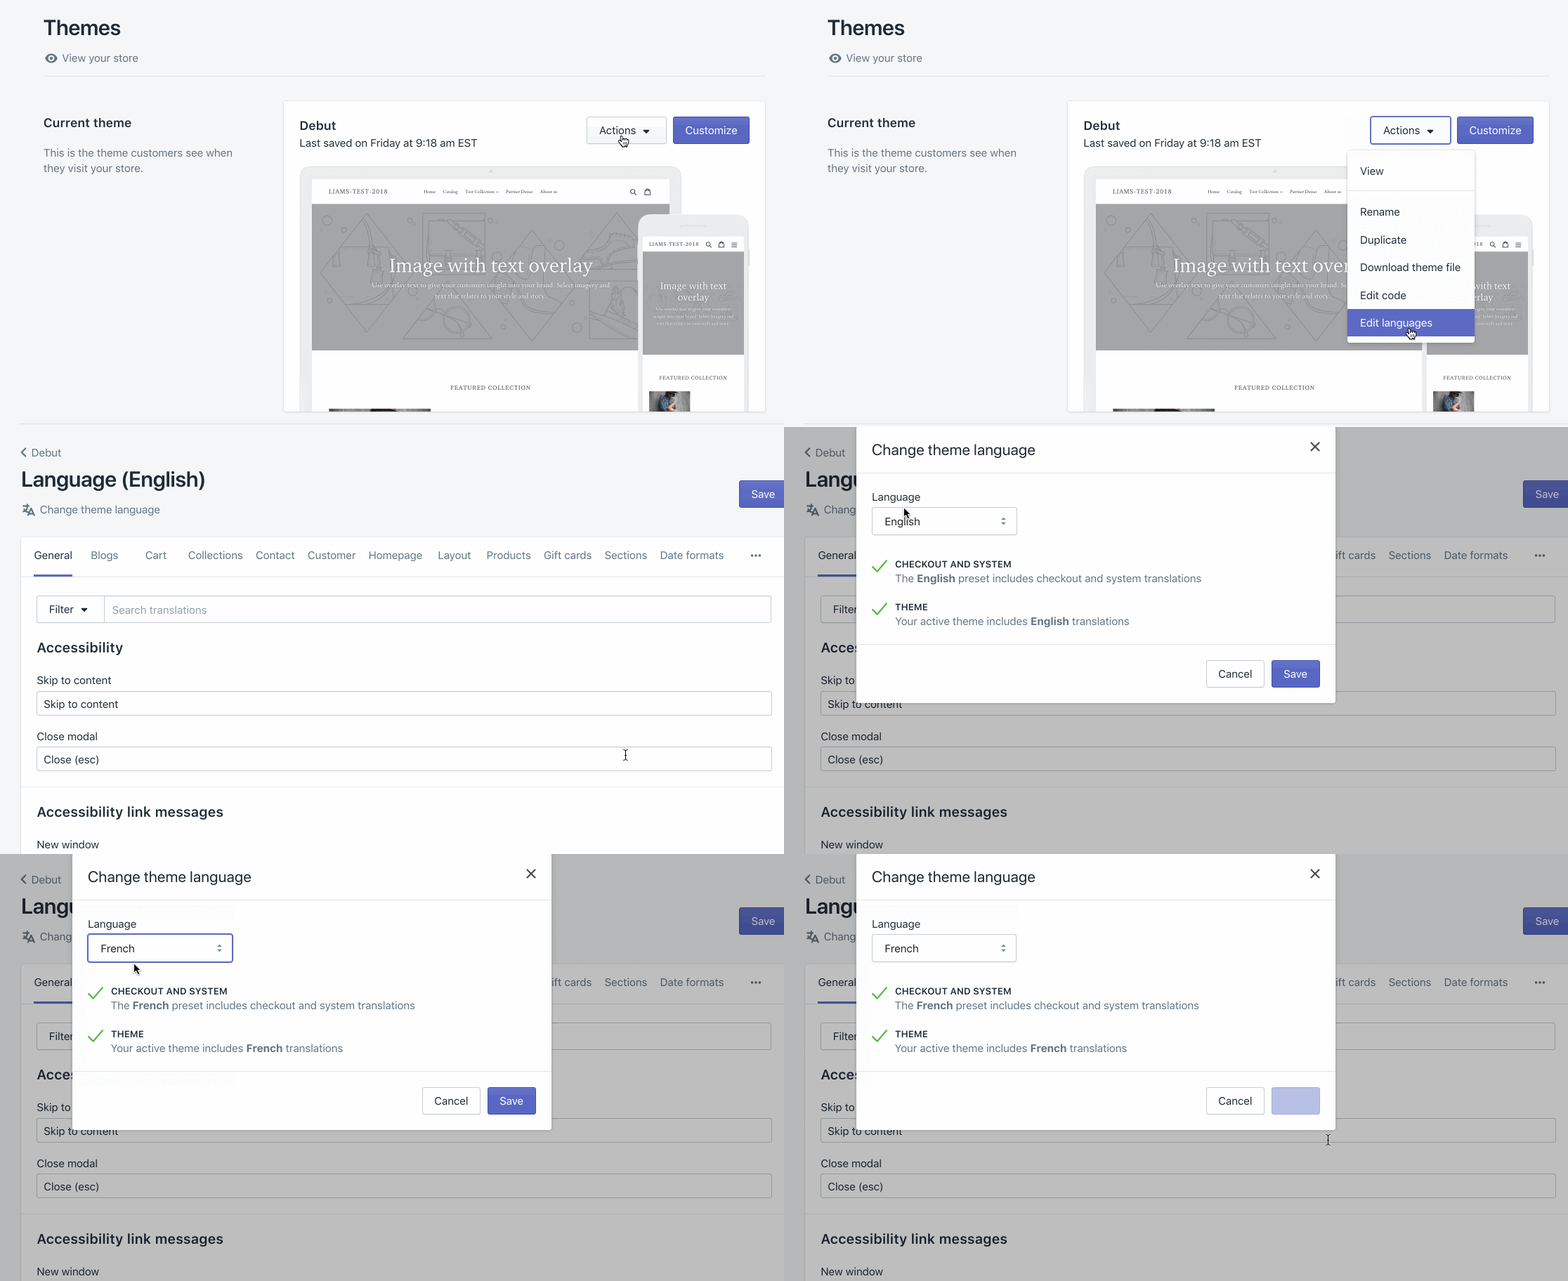
Once you’ve used translation keys with the t filter to set up the text on your store, and created locale files for each available language, your clients can select which language they would like to display using the Language Editor. This editor also allows your clients to edit the translations, or wording, which is especially helpful if their brand has a unique tone, or style.
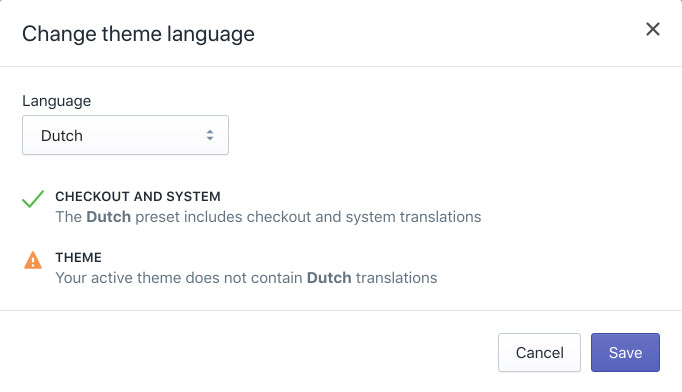
This interface displays a range of other information which is useful for merchants, since it identifies which translations are available, and where the translations are applied. For example, the checkout may have translations available which are not present on the theme itself, as seen below:

It’s also helpful for theme developers to troubleshoot missing translations here, as you can filter the search results to show any text where a translation is missing. This ensures that your theme has all the necessary translations before you hand over the theme to a client.
Considerations for naming translation keys
Since translations are organized by different levels and categories in the locale files, our translation keys need to follow a specific format. When naming translation keys, the format we follow is:
1st-level.2nd-level.3rd-level
Each level of the translation key is used to navigate to a level of the hierarchy of the Shopify Language Editor:
- 1st level: Translation category
- 2nd level: Translation group
- 3rd level: Translation description
The first level, or translation category, refers to one of the top-level tabs you would see in the Language Editor, and could include Product, Blogs, or General. The second level, or translation group, refers to objects that define the sections within a tab, which can include Products, Articles, or Navigation, depending on the category.
Finally the third level refers to the actual individual element, or translation string itself, within a specific section. This could include add to cart buttons, “read more” links, or next buttons.
If we look at our add to cart example, we can see the three different levels:
{{ 'products.product.add_to_cart' | t }
In this case products is the first level, or category, product is the second level, or group, and add_to_cart is the third level, or string.
When creating your own translation keys, it’s important to keep consistency in mind and to ensure that the structure of your keys reflects the structure of your theme. This will help clients to locate a translation easily when using the Language Editor.
In fact, the grouping and sequence of your translation keys impact how the information is displayed on the UI of the Shopify Language Editor. This means if the code is consistent, and keys are organized, it will lead to a better user experience for your clients.
You Might Also Like: How to Use Liquid to Create Custom Landing Page Templates.
Translation is key
It’s important for developers to adjust and respond to changing commerce trends by considering how they can build websites that are flexible and can be localized using translation keys. By making your themes translatable, or providing a service to tweak existing themes to use translation keys, you can make it easier to connect with foreign clients.
"Shopify’s translation keys and language editor provides a much more robust method for ensuring your client’s message doesn’t get lost in translation."
While services like Google do offer translation tools for web pages, it may not be an accurate representation of the copy a client would like to present. Shopify’s translation keys and language editor provides a much more robust method for ensuring your client’s message doesn’t get lost in translation. It’s also possible to create different locale files for different dialects—for example, you could create a set of translations for Brazil Portuguese and European Portuguese.
As you can see, there’s a range of ways that Shopify’s internationalization methods can be used to make your themes responsive to the needs of your clients—wherever they may be. Hopefully with the help of this article, making these localization changes and connecting with international clients will be easier.


