At first glance, building an app to serve Shopify merchants can be daunting—first, you need to identify a problem that merchants need solved. Next, you need to understand how your app will actually solve that problem. Then you need to pick your technology stack, design the interface, and build the whole thing from the ground up. It can be a lot of work—so using the right resources and libraries is crucial to your success.
Here at Shopify, we want to help our partners build and launch apps faster. We’ve been working hard to create an end-to-end tutorial on building an embedded app with Node and React, one of the fastest-growing tech stacks out there today. You can click through to access the whole tutorial, or read on for a deep dive on one aspect of building Shopify Apps: embedding your app in the Shopify Admin.
In this article, we’ll use Shopify’s koa-auth package to set up a server file for authentication. The Koa middleware takes care of most of the heavy lifting for you, and gets you embedded faster and with less hassle. Let’s take a look at how we can do that using Node, Koa and ngrok for local development.
Keep in mind, this will only go over setting up your node server and creating a tunnel for your localhost in development. The code in this article will not provide scaffolding for the front and back end of your app, nor a complete server. Luckily, we do have that covered! If you’d like to take a look at a step by step process for building an embedded app, head over to the full tutorial.
Use ngrok for local development
In the Shopify ecosystem, embedded apps run in an iframe in a production environment. In order to test the functionality of your app within that context in development, you’re going to want to tunnel what you have running locally to an accessible URL. This is where ngrok comes in.
Ngrok is a cloud service that accepts traffic on a public address, and then relays that traffic through to the ngrok process running on your machine, and on to the local address you specified. This gives you the ability to send users to this URL while you continue developing.
Assuming you’re developing a full stack application, running on localhost:3000, go ahead and install ngrok on the command line:
npm install ngrok -g
After it’s installed, have ngrok create a tunnel on port 3000:
ngrok http 3000
Once running, it should look something like this:

At this point, if you head to the https URL provided by ngrok, it should show you whatever you have running locally on port 3000.
You might also like: The Shopify GraphQL Learning Kit.
Create a new app
To develop apps for the Shopify ecosystem, you’ll need two things:
- A Shopify Partner account
- A development store
Shopify Partners can create development stores through their Partner Dashboard for testing purposes. Development stores are free of charge, hold no time restrictions, and offer most of the same functionality as the Advanced Shopify plan, so you can test your app as you work.
To invoke the authentication middleware, you’ll need your Shopify API key and Shopify API secret.
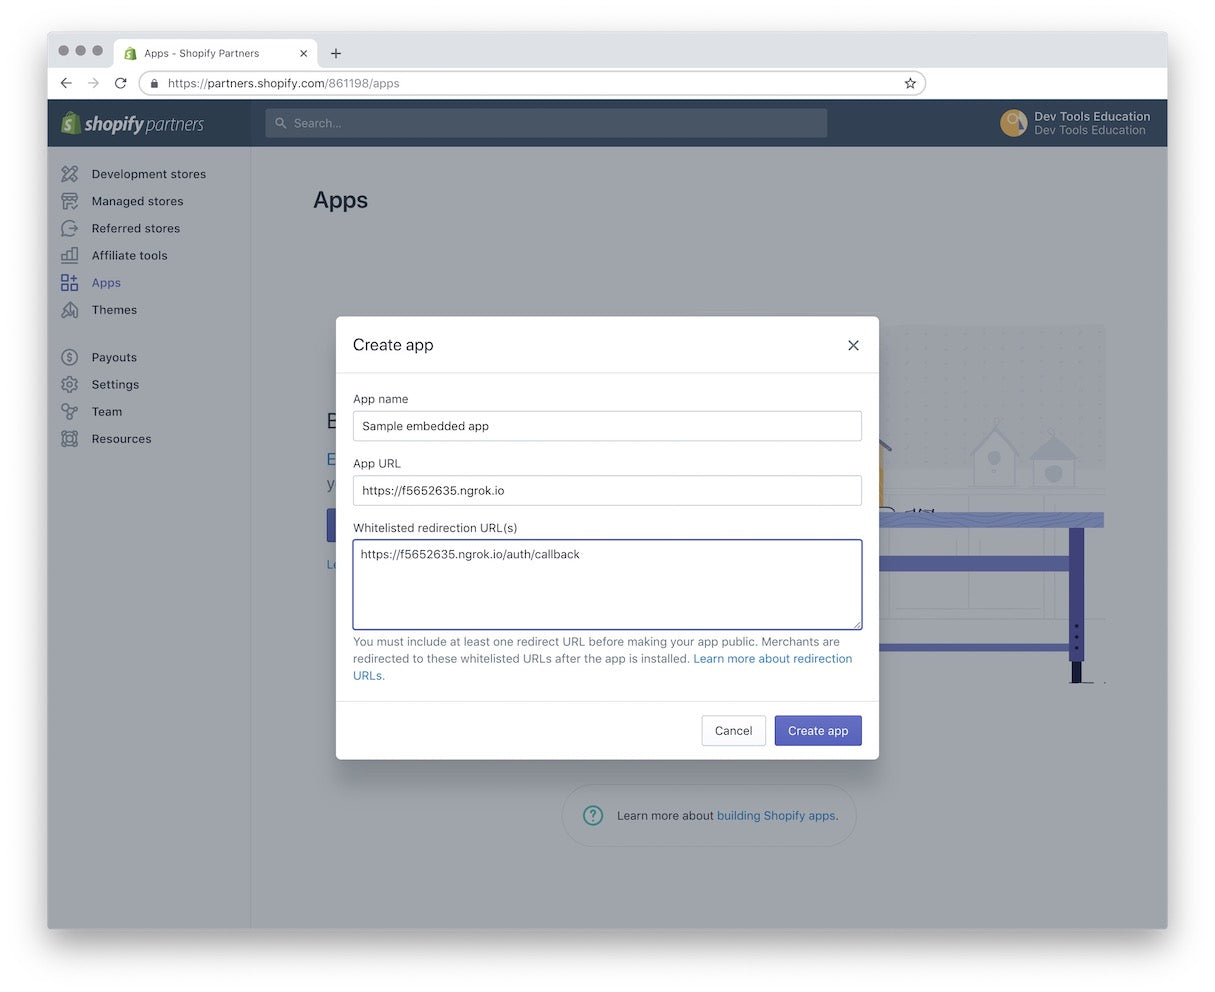
- From your Partner Dashboard, click Apps.
- Click Create app.
- Copy the HTTPS version of the forwarding URL from your ngrok terminal tab.
- Give your app a name, such as Sample embedded app.
- Paste the HTTPS version of your ngrok forwarding URL into the App URL field.
- Paste the same HTTPS forwarding URL into the Whitelisted redirection URL(s) field and add
/auth/callbackto the end of the path. - Click Create app.

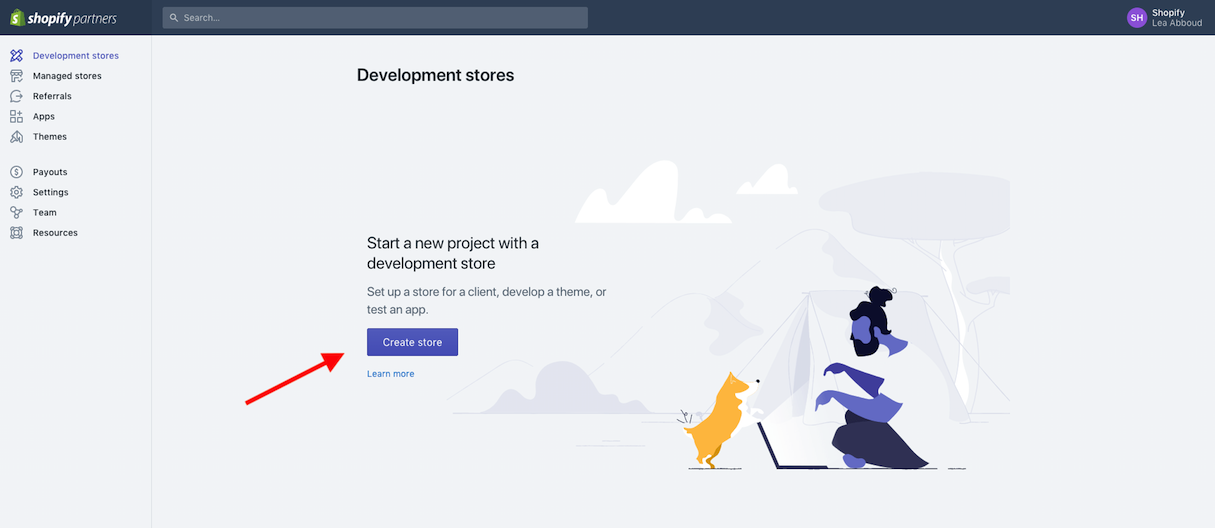
If you don’t have a development store yet, this is a good time to set one up.
- In your Partner Dashboard, click Development stores on the left.
- Click the Create store button.
Give your store a name and fill out the remaining fields.

While we're on the subject of URLs, learn what a canonical URL is and why they're so important.
Create your server
Now that you’ve set up your app, you can set up your server. As mentioned, we’ll use koa-middleware in this node server. Koa is a middleware framework that we use internally at Shopify, because it’s both lightweight and modular. The koa-shopify-auth package handles most of the authentication process out of the box by creating routes for install and callbacks and taking care of HMAC validation.
One thing to note is that this package uses fetch to make requests against Shopify’s APIs, which some older node versions don’t support. To avoid any issues, you’ll install a small library called isomorphic-fetch, which polyfills fetch for you.
To get started install koa, @shopify/koa-shopify-auth, koa-session, and isomorphic-fetch on the command line:
npm install --save koa @shopify/koa-shopify-auth koa-session isomorphic-fetch
In your server file (in our example, server.js), set up your imports:
For this example, we will set up our middleware by hardcoding the API key and API secret key. As the name implies, these keys are secret and should not be hardcoded in your server or saved in cloud-based services. In our tutorial, we go into detail on setting up .env files to store your keys safely.
After setting up your keys, you can set up the instance of your app, and use your keys to call the shopify-koa-auth library:
The koa-shopify-auth library provides the shopifyAuth function. This function expects your API key and secret, as well as the scopes your app will need to make requests. It uses the app’s session to get the shop name and access token from the response.
Note that for illustrative purposes, this example console.logs your access token. That’s great for learning purposes—but not something anyone would want to do for a production app.
Shopify-koa-auth also provides a verifyRequest middleware that we’ve used in our guide as an example as well. It gives you the ability to redirect users who are not authenticated.
At this point, you have an incredibly simple server that can take care of authentication for you. The Koa package uses the auth/callback route to authenticate, which is why you would have set it up in your app as the callback route in the Partner Dashboard.
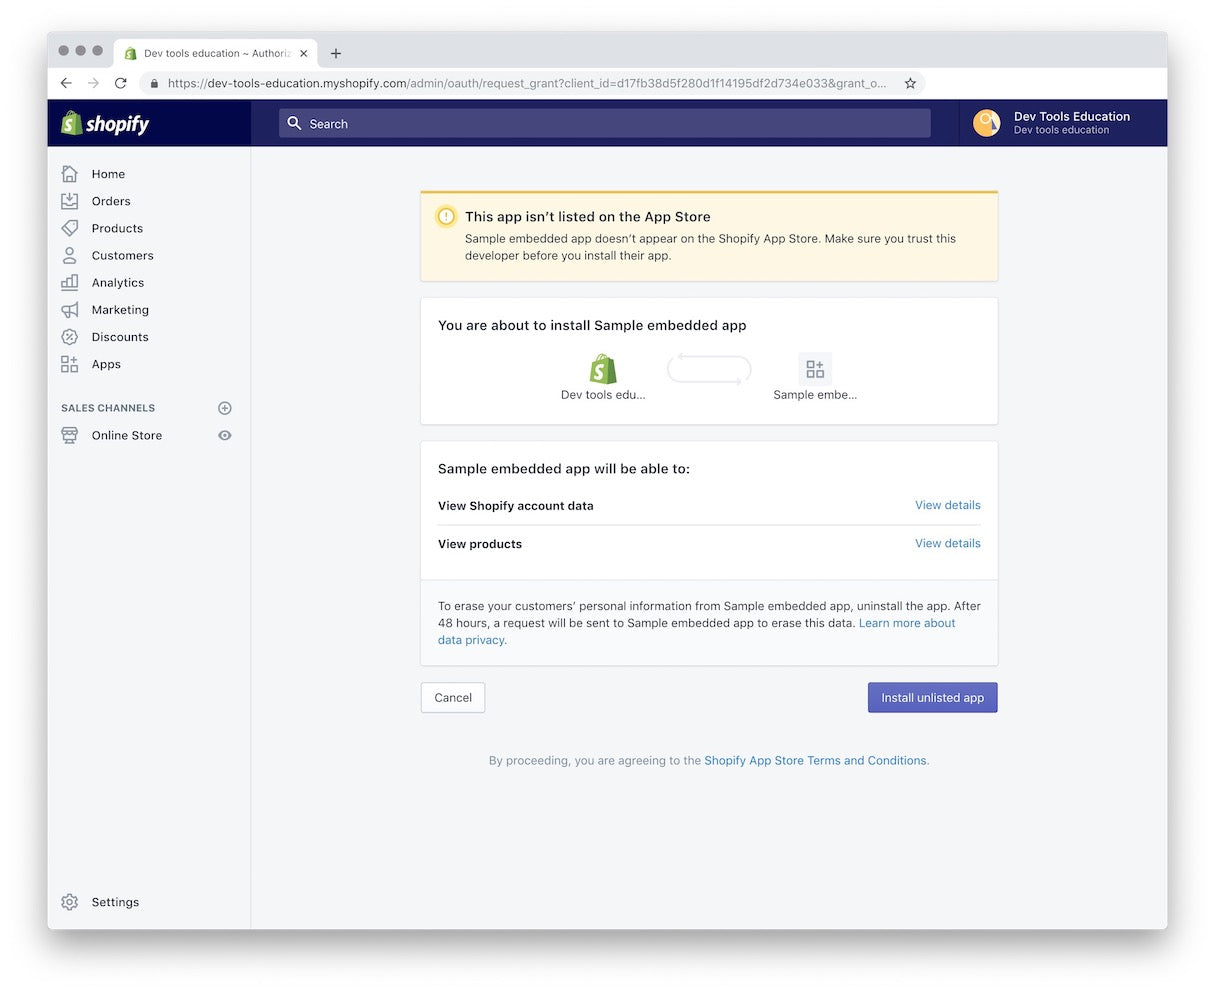
Providing you had your app running on a localhost, you could then head to https://YOURNGROKURL/auth?shop=YOURTESTSTORE.myshopify.com to authenticate your app. If successful, you’ll see a screen that asks for permission to install the app and lists all of the scopes you’ve identified in the shopifyAuth middleware.

This is why it is so important to only ask for the permissions you really need. Put yourself in the position of a merchant being asked for these permissions—ask only for what your app requires, and make it clear why you need that access.
You might also like: How to Build a Shopify App in One Week.
Build apps faster
This middleware takes care of a lot of logic for you, keeps your server file tidy, and provides a battle-tested, internally used tool to help you solve merchant problems faster. Now that you’ve embedded your app within the Shopify Admin, you can start testing your UI and building out your app knowing that you’re seeing exactly what your merchant will see.
If you’re curious about other Javascript packages developed internally, check out quilt on GitHub. If you’d like to code along and build an app in JavaScript using some of those packages, check out our full tutorial.
Read more
- How to Build a Shopify App: The Complete Guide
- How to Use Polaris to Build an App UI in HTML or React
- How to Build a Shopify App as a Front End Developer
- Build with Hydrogen: Developer Preview Now Available
- User Testing Your Shopify App: Public App Use Cases You Should Test
- How To Add Your App to the Shopify App Store
- How to Level Up Your App with Theme App Extensions
- How to Work with Shopify’s query Argument in GraphQL
- Working Together: How Having an Integrated App Can Grow Your User Base
- Shopify App Challenge Past Participants: Where Are They Now?


