Designing a website is a massive undertaking for designers and business owners alike. But whether you are building a new website or redesigning an existing one, it’s crucial to base your decisions on data, rather than intuition. The decisions you make during the design process can determine creative and financial prosperity or failure — for both the client and the designer.
To avoid any potential pitfalls in your next build, you should start including A/B testing as a standardized service in your design packages. Conducting simple A/B tests on your clients’ websites will allow you to work out any shortcomings with regards to design, navigation, and functionality before handing over the reins. That way you’ll be able to offer them a final product that is not only visually stunning, but also optimized for conversion — and they’ll love you for it.
Sound interesting? Read on and find out how A/B testing will make you a better web designer.
A/B testing 101
A/B testing (also known as split testing) allows you to compare two variations of a design element on a website, with the purpose of identifying which element is most effective at accomplishing a specific objective.
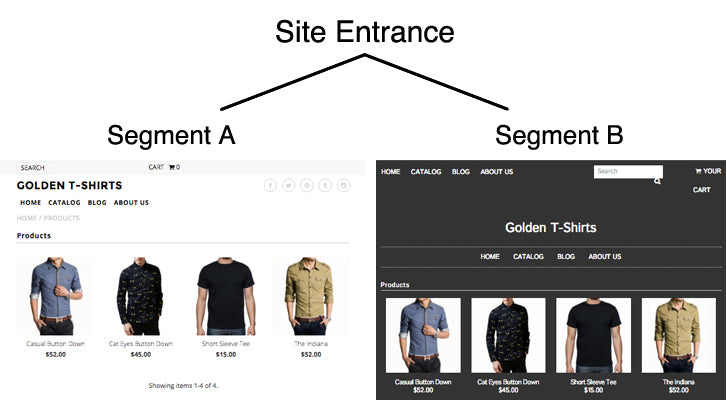
In an A/B test, visitors are randomly divided into two segments as they enter a site: half are placed in “segment A”, while the other half go into “segment B”. Each segment is then shown a variation of a specific design element of your choice — for example, a landing page, store theme, call-to-action button, or checkout flow.

By testing two variations against each other in real-time with real users, you are able to collect meaningful data to determine how each version of an element influences the behaviour of your visitors. In turn, this gives you the insight to create a design that will yield the best results for your client’s online business.
Essentially, A/B testing allows you to design the best website possible for every single project.
Why web designers should A/B test
Creating the best website possible should be reason enough for you to start offering A/B testing as a standard service in your design projects. But if you still aren’t convinced, here are a few other benefits you can expect to see:
1. Increased revenue — By including A/B testing as a service you offer as a freelancer, you will be able to bring in more revenue on projects. You can either include it as a standardized service within your web design packages, or you can leverage the benefit of website optimization as an upsell feature. Your clients are spending a decent sum to have their site built professionally — use A/B testing as a post-launch service to make smart design changes that will help them get the best bang for their buck (and earn a few more yourself too).
2. Reduced client disputes — When it comes to making decisions about the design of a website, everyone in the room seems to have an opinion on what the site should look like — especially the client who’s paying for it. Luckily, A/B testing gives you concrete data to guide decision-making and resolve unnecessary debates without offending the client.
3. Satisfied clients — It’s easy to focus all our energy into the visual design of a website and overlook its functional purpose. While most clients do want a beautiful looking final product, every client is more concerned with having a site that converts. Running A/B tests shows your client that you genuinely care about their business’s online goals and are willing to do whatever it takes to make sure they’re accomplished.
How to design a simple A/B test
If you’ve never run a web optimization experiment before, A/B testing can appear pretty daunting at first. But don’t worry, creating a simple A/B test is, well, pretty simple. Below I’ll outline a strategic method you can start using to run your first A/B tests.
Define your objective
Before you start testing anything, you need to understand the purpose of your website. Understanding the purpose of a website allows you to identify what success means for your client in terms of quantifiable metrics. These metrics, known as conversions, represent the desired action you want a visitor to take on your site. By defining your objective and success metrics early on, you are setting up the framework for which your A/B testing will operate within.
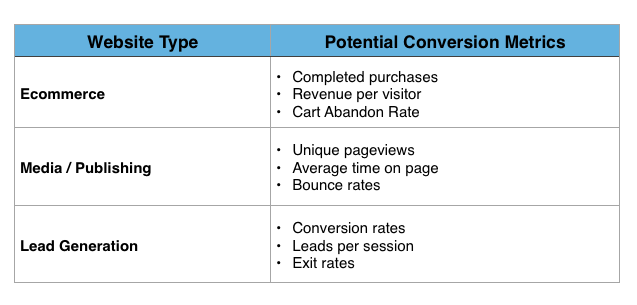
Your conversion metric will vary based on the type of website you are designing. Here’s a table that outlines some common conversion metrics for various websites types:

You might also like: A Short Tutorial for Running A/B Tests in Shopify with Optimizely
Identify bottlenecks
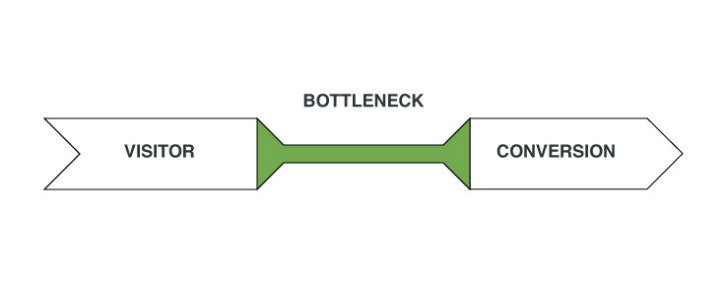
For your tests to have the greatest results, you will need to identify the areas of your funnel where users are losing momentum or dropping off in their journey towards conversion. These barriers in user flow are known as bottlenecks. It’s these bottlenecks that negatively influence the performance of your website and where you’ll want to run your A/B tests.

If you have Google Analytics set up on your client’s store, its built-in conversion tracking can provide a relatively easy way to identify potential bottlenecks in your user experience. While setting up your conversion goals in the analytics admin, simply create a conversion funnel by defining the series of events or pages a user must interact with on their way to conversion.
A simple example of a conversion funnel commonly seen on ecommerce sites would be: “add to cart,” to “view cart,” to “checkout,” to “payment method,” and finally “order confirmation.” Here’s a great guide to get you started with conversion tracking on Analytics and another for setting up more advanced funnel conversion tracking.
Once your conversion goals and funnels are set up, you’re able to identify bottlenecks with the “Goal Flow” report found in the “Goals” section of Google Analytics. By highlighting the pages and events that cause the most drop-offs and exits, this report can help you focus your efforts on the areas that will benefit from testing the most.

Create a hypothesis
Once you’ve established your objectives and identified your bottlenecks, you should create a hypothesis with regards to how you believe your site changes will alter visitors behaviour. This makes your test more valuable because it adds a layer of purpose to the process and ensures you stay on track throughout the implementation.
For example, let’s say your client’s ultimate objective is to decrease their website’s cart abandon rate. You’ve done your research and identified that the bottleneck influencing the existing rate is the “delivery information” page that appears after the “billing information page” and before the “confirmation” page. In this case, your hypothesis could look like:
“If we shorten our checkout flow by consolidating the billing and delivery information pages into a single page, then our overall cart abandon rates will decrease.”
If you attempt to run a test without creating a hypothesis, you will still gather valuable data about your visitors. Unfortunately, you will miss a deeper level of analysis and validation as to why the results appear the way they do. Even if your test fails, you are still able to draw conclusions from your experiment. The beauty of experimentation is that you’ll be able to scrap any idea that doesn’t work before implementing it to the entire site.
Design some variants
Before you can start implementing your experiment, you’ll need to create variants for the particular design element you are testing. Your original version of the element will act as the control while your new version would be a variation of that control.

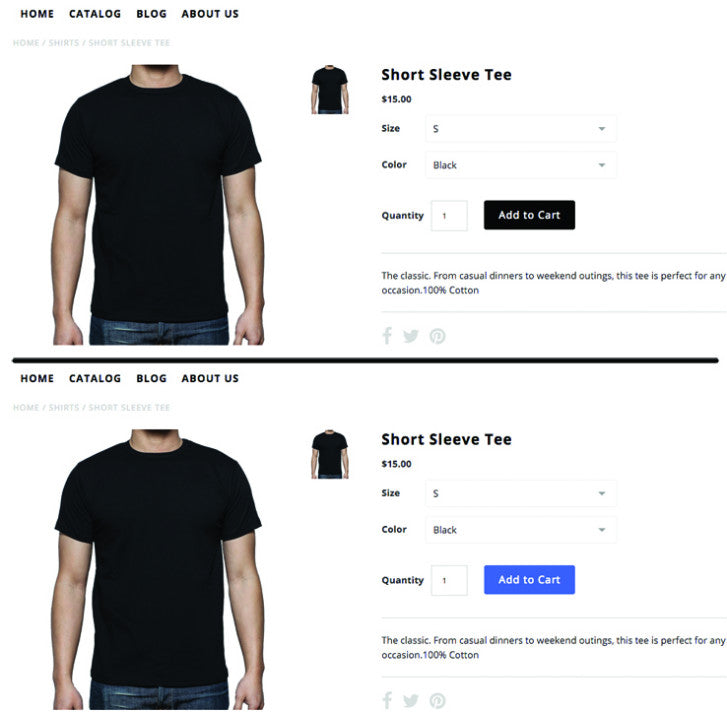
In order to develop the most accurate and unbiased A/B test, make sure only one aspect of your control variant is changed in the new version. For example, you can test the colour of a call-to-action button (as seen above) or its position on the webpage, but not both simultaneously. Reducing your tests to a single variant change ensures that you can confidently attribute any change in behaviour to the design change you made in your variant.
Start testing
With your bottlenecks identified and your design variants built, you are almost ready to start running your A/B test. To ensure your test provides the most accurate results, you’ll want to ensure the following two things occur during implementation:
1. Display your variant and control elements simultaneously to a randomly selected group of site visitors.
2. Run your test long enough so that it is shown to the largest sample size possible.
Following these two guidelines will help guarantee the experiment provides the most statistically significant results possible. That way, you can rest assured that the data you’re using as the basis for your final design decisions is reliable and accurate.
One of the easiest ways for a beginner to start implementing an A/B test on their site, regardless of whether or not it is on Shopify, is by using an A/B experimentation tool. There are various tools out there that you can use to perform A/B tests on your website, but I’d suggest starting with Optimizely, unbounce, or Google Analytics Content Experiments.
And if you’re looking for some extra resources to get started, check out these comprehensive guides:
Become a better web designer
The most successful web designers know that the handover of a website is only just the beginning. Every single project brings on nearly endless opportunities for experimentation and optimization. By offering A/B testing as a service in your standard design package, you’ll be able to increase your revenue, help your client achieve better business results, and build a website you can be truly proud of.
What are you waiting for? Get out there and start testing your way to becoming a better web designer.
Read more
- How to Create a Sticky Add to Cart Button On Scroll
- How to Upload and Animate SVG Icons in 3 Simple Steps
- Typography in UI Design
- What Makes or Breaks an Ecommerce Shopping Experience? This Survey has the Answers
- How To Harness The Power of Process Mapping
- Shopify's Mobile Device Testing Lab Gets Wheels
- The Use of Color Contrast in Mobile Ecommerce Design
- How to Use an Empathy Map in the Design Process
- Human-Centered Design: An Introduction, Practices, and Principles
You might also like: Split-Testing: How to Run a Revenue-Driven Test in Shopify


