When you think of online shopping, there’s a very good chance that the kind of product that first comes to your mind is clothing. This isn’t surprising at all: indeed, it’s a testament to the omnipresence of clothing stores and clothing-related ads online. Not only are clothes a necessity, but they’re also the most visible way we have of expressing ourselves, which is something most of us love to do. As a result, most of us take a lot of interest in the clothes we wear.
This also means that clothing is an excellent choice of product to sell if you’re thinking of starting an online store. Some additional characteristics that make this market attractive are:
- a high growth rate: in 2021, the Indian fashion industry grew by a whopping 51%.
- the large number of variations, niches, and price points within this category.
- the relatively low initial investment needed.
- the fact that no special skills are necessary to get started.
This last point is especially important: contrary to what one might assume, you don’t need to be artistically talented or be a trained designer to sell clothes online. Having such skills can be an advantage, of course, and they can definitely come in handy in many ways. However, such skills are not essential by any means, and you can set up a successful online clothing store even if you’ve never sketched anything since fifth grade. Read on to learn how.
The main steps to get an online clothing store up and running
Starting an online store is exhilarating, but it’s also bound to come with a set of challenges. This doesn’t mean, however, that getting your online business off the ground has to be complex or convoluted. We’ve broken down the process of launching an online clothing store into just five main steps, which cover everything from ideation to promotion:
- Choose your business model.
- Pick your niche.
- Get your products/designs made.
- Set up an online store.
- Market your store.
Let’s take a deeper dive into each of these steps.
1. Choose your business model
Here, ‘business model’ refers to the actual manner in which you create or obtain your products, and hence generate value for your customers. In the online clothing market, there are three main business models that you can consider, depending on your skillset, budget, and goals:
- Design and make your own apparel.
- Resell apparel made by third parties.
- Print-on-demand and dropshipping.
Design and make your own apparel
This model will make sense for you only if you have some design skills or experience. If you do, and you’d like to create an original clothing line, then this is the way to go.
With this model, you first need to come up with a fresh take on the multitude of garments out there. Among the many characteristics of a garment that you can experiment with are: the cut, silhouette, fabric, colours, and pattern. Then, you need to source some suitable fabric, as well as any other components you might need, such as buttons or clasps. Lastly, you need to cut out the fabric and sew the garment as per your design.
While you could, in principle, see each of your products all the way through from their design to their actual creation, in practice, you’ll most likely want to delegate the last step above to a competent tailor.
This model also makes it straightforward to sell custom clothing, as each product will typically be made to order.
Pros:
- You’re limited only by your own imagination.
- You have a very high degree of control over the final product.
- Products can be customised fairly easily (e.g. with a customer’s initials, or if a customer has specific fitting-related requirements).
- Does not need a large budget.
- If they’re made well, the fact that the products are handmade can fetch you a premium.
Cons:
- Not scalable, as the products aren’t mass produced.
- Can be difficult to find a tailor whose sensibilities match yours.
Resell apparel made by third parties
In this model, instead of creating garments from scratch, you’ll purchase ready-made garments and resell them. There are two common ways to implement such a model.
The first is a curation-oriented model, where you add value by building collections that focus on particular styles, themes, niches, or target audiences. The other is a ‘white-label’ or 'private-label' model, where a manufacturer prepares garments according to your directions, typically in bulk, and then applies your branding to it.
To go with this model, you don’t need to have any design skills at all: providing the manufacturer with detailed verbal descriptions or photos of similar products should be enough.
Pros:
- No design skills required.
- If buying in bulk, a low unit price can be obtained.
Cons:
- You have to hold some inventory, which makes this model riskier and more capital-intensive than the model above.
Print-on-demand and dropshipping
Print-on-demand (POD) refers to a model involving the following flow:
- You list a collection of garments with printed designs or quotes on your store (typically t-shirts, hoodies, and similar garments).
- When a customer orders a product on your store, that order gets forwarded to a ‘POD provider’, who gets that printed garment made.
- The POD provider then ships the ready garment to your customer.
Dropshipping refers to a model with a very similar flow where you list products offered by a company called a ‘dropshipper’; when an order is placed, it’s forwarded to the dropshipper, who then ships the relevant product to the customer.
As you can see, there’s a large overlap between these models. Thus, while print-on-demand and dropshipping are technically distinct, in practice, there’s such a strong coupling between them that it makes sense to talk about them together.
In addition, while dropshipping is in fact a kind of reselling, the big difference between it and run-of-the-mill reselling is that you don’t have to hold any inventory at all.
You can implement these models regardless of whether you have any design skills or not; if you’re not a designer, you can always get designs made from freelancers online. There are even some free online tools that can enable non-designers to create reasonably good designs on their own.
Pros:
- No design skills required.
- No inventory required, thus reducing the risk as well as the cost of getting started.
Cons:
- Since the main selling point of your garments will be the printed design on them, you might have to spend a fair amount of money finding a designer who can consistently provide your with “winning” designs that sell well.
2. Pick your Niche
Although the online clothing market is vast and still growing, it’s also extremely competitive. With customers spoiled for choice and behemoths like Amazon and Flipkart often offering deep discounts, online store owners absolutely must go the extra mile to attract and retain customers. One of the simplest but most impactful ways to do so is to be a specialist instead of a generalist.
In other words, you need to go all in on a niche.
Drilling down into a niche has several advantages:
- It can help you decide on your store’s name and branding
- Niches are typically associated with lower advertising costs
- Your audience is likely to be more invested, passionate, and loyal
- Your brand will probably be more memorable, increasing the chances of word-of-mouth sales
The kinds of niches you’ll have to be mindful of will depend on the business model you choose. With POD, there’s typically nothing special about the garment itself, and what really matters is the niche catered to by the design/quote printed on it. These niches are often:
- profession-based (e.g. nurses, STEM workers, programmers)
- hobby-based (e.g. gymming, gaming, sports)
- animal-based (mostly cats and dogs, but almost any animal will sell)
With the other two models, the type and purpose of a garment play the biggest role in determining its niche. For instance, pants for pregnant women, women’s pants with pockets, plus-size apparel, knitwear, hiking apparel, party dresses, etc. can all be said to be niches. There are also style-based niches, such as Bohemian, Preppy, Vintage, etc. And of course, the cut, fabric, silhouette, and other characteristics will also contribute towards fine-tuning a garment’s niche.
Ok, so it’s essential to pick a niche. But how do you decide which one?
Well, to begin with, let’s rule certain specific niches out: you should keep away from anything that you know to be or is likely to be copyrighted, such as designs depicting comic book or TV show characters.
Ideally, the niche you focus on should be something that you personally care about and are interested in. However, while this is certainly an ideal to strive for, it may not always be practically possible.
In terms of what makes sense from a business point of view, you want to mainly aim for a niche that is demonstrably popular and that sells well. One of the best tools to find such niches is the Meta Ad Library, which is a compilation of all the ads put up on Facebook and Instagram in the recent past. These ads can tell you which niches are being heavily targeted by companies of various sizes, which will indirectly tell you which niches are currently popular. You can then shortlist a few of them and pick one that you’re willing to focus on.
3. Get your products/designs sourced/made
It’s at this stage that your ideas and plans will finally start to turn into concrete reality. The process you’ll follow to source your products or get them made will depend on your business model.
-
If you’re designing and making your own apparel:
- Start by creating a design. While a sufficiently detailed hand-drawn sketch might suffice for certain purposes, you might also want to consider using clothing design software for sufficiently complex or specific designs.
- Purchase the fabric you’ll need. Commonly used fabrics such as cotton, linen, and silk are quite readily available in markets all across India. You can also buy fabrics online at sites such as Fab Couture and Fabriclore.
If there’s a very particular print or pattern that you need, you can also buy customised fabrics from sites such as Sympico and, once again, Fabriclore. Note that typically, such custom orders will have a minimum order quantity of at least several metres; for instance, Fabriclore requires the total order quantity on every order to be at least 50 metres.
Lastly, an excellent source for artisanal Indian prints and fabrics is iTokri.
- Sew the garment yourself, or find a reliable tailor. When you’re first starting out, and if you have the necessary equipment, it might make sense to do the sewing yourself. This will keep your initial costs down, and also allow you to make sure the finished product turns out exactly as you imagined it.
In the long run, you might want to consider delegating this task to a tailor, so that you can focus on other critical aspects such as managing your site, interacting with customers, and marketing your business. Finding a reliable tailor, however, is something that can take a while. Tailors who’re set in their ways might have trouble bringing to life any idiosyncrasies or quirks that you might have inserted in your designs.
A fair amount of trial and error, along with a lot of patient communication, is what you’ll need if you’re to find a tailor you can build a relationship with. You can also explore sites such as LBB for a list of recommended tailors in your city.
- Start by creating a design. While a sufficiently detailed hand-drawn sketch might suffice for certain purposes, you might also want to consider using clothing design software for sufficiently complex or specific designs.
-
If you’re going to curate a collection:
- Decide on a theme for your collection: something like Women’s Ethnic Wear, Vintage Clothing, etc.
- Purchase outfits that meet your theme’s criteria, whether in brick-and-mortar stores or online. These outfits need not be branded. Street shops and flea markets are often excellent sources for interesting and quirky pieces.
- Another way in which such curation can be implemented is by offering subscriptions to ‘fashion boxes’, as is done by Krate, for instance. This will provide you with a recurring income, and you will have a chance to delight your subscribers by exercising your taste and sensibilities.
- Decide on a theme for your collection: something like Women’s Ethnic Wear, Vintage Clothing, etc.
-
If you plan to use a white-label service:
- Decide which white-label service you’d like to source your products from. Some such services in India are Synerg, Byc and Cheer Sagar. Remember that you usually won’t be able to buy single units, and will have to order at least 25 units or more, depending on the service.
- Discuss the details of the products you want with the service’s sales team. Once the deal has been finalised, you should receive your products in the specified time frame.
- Decide which white-label service you’d like to source your products from. Some such services in India are Synerg, Byc and Cheer Sagar. Remember that you usually won’t be able to buy single units, and will have to order at least 25 units or more, depending on the service.
-
If you’re going to use POD or dropshipping:
-
Decide which POD provider you’d like to go with. In India, some popular POD providers are Printrove, Blinkstore, Qikink and Vendorboat. If you plan to mainly cater to customers in the US or Canada, make sure to take a look at Printify and Printful.
As far as dropshipping service providers go, you should take a look at Oberlo and, once again, Printrove. -
Decide what kinds of garments you want to sell in your store. Most POD providers offer a limited set of garments that you can print on, typically various kinds of t-shirts and hoodies. Dropshipping service providers, however, usually offer a much broader range of garments.
The next two steps only apply to POD.
- Get some suitable designs made in keeping with the niche that you’ve decided to focus on. Assuming that you’re not a designer, there are two routes that you can take: you can either hire a freelance designer on platforms such as Fiverr, Upwork and Freelancer, or you can create a design yourself using easy-to-use design tools like Canva.
- Upload the designs in your POD provider dashboard. You can then place and adjust them on the garment mockups provided there until you’re satisfied with the way the finished garments will look. Once this step is done, any time a customer of yours places an order for one of your store’s products, the details of that order will be forwarded to the POD provider, who will then fulfil it without you having to get involved with the shipping side of things.
When you’re first starting out with POD or dropshipping, it’s a good idea to order a few samples from your chosen POD or dropshipping service provider so that you can evaluate the quality of their products, and pivot to a different provider if needed.
-
4. Set up an online store
Now that your products are ready to be shipped out the moment an order comes in, it’s time to focus on building your online store. While there are several free as well as paid platforms that allow you to create an online store, we’ll take a look at the steps needed to create and set up a Shopify store.
- Start by creating an account on Shopify. Once you enter your brand name, your store will be assigned a temporary domain name of the form ‘www.
.myshopify.com’.
You can change this domain name later by buying a domain name of your choice from a domain registration service such as Namecheap and GoDaddy.
- Customise the visual aspect of your store: pick a theme, decide which page elements to show or hide, and add a logo for your store.
You can get a logo made using the freelancer platforms mentioned above, such as Fiverr and Upwork, or you can make it yourself in Canva. There are also several free logo makers online, such as the Adobe Express logo maker.
- Make sure to add certain essential textual components to your store, such as a Privacy Policy, a Terms and Conditions page and an About Us page.
- It’s now time to start adding products to your store. At this point, there are two ways you can do so: if you’re working with a POD or dropshipping service provider, then you’ll need to use that provider’s app to add your products; otherwise, you’ll have to add them manually in your Shopify dashboard.
Through a provider’s app
Let’s assume that you’ve decided to use Printrove as your POD provider. At this stage, you must already have uploaded your designs and finalised your products within your Printrove account. Now, here’s how you would add those products to your Shopify store:

Source: Printrove
3. If you plan to use a dropshipping service provider like Oberlo, the process to add products from their platform to your store will be very similar to the one we just described: simply install the Oberlo app, go to its catalogue, and start adding the products you want.
Manually
1. Go to your store’s dashboard and click ‘Products’ on the sidebar on the left. 
2. Click the ‘Add product’ button in the top right corner. 
3. Add all relevant product details, such as the name, description, images, etc. 
4. Next, add the pricing and inventory details of the product on the same page. 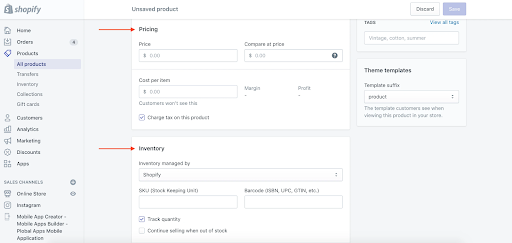
5. Also make sure to add the product’s shipping details. 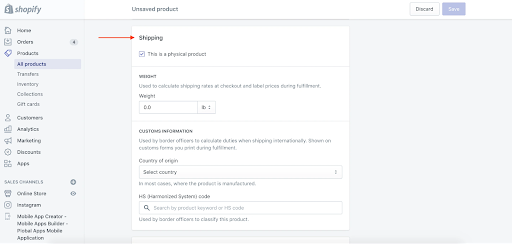
6. Modify any other options that might be relevant to that product, and then click ‘Save’. Your product will now have been added to your store dashboard.
Now that your products have been added to your Shopify store, you should quickly review all your product images to make sure they’re clear and accurate, and your all product descriptions to make sure that they are free from typos (which helps with SEO; more on SEO later).
8. To do so, click ‘Online Store’ in the left-hand sidebar and then click ‘Customise’. You can then go through each product page and check the images and text in there.
9. Add a payment method by going to ‘Settings’ > ‘Payment Providers’.
10. If your business model isn’t POD or dropshipping, partner with a delivery company such as Shiprocket through the Shopify App Store.
11. At this point, your Shopify store has been created and set up, but it hasn’t gone live yet. To actually open your online store for business, you’ll need to pick a Shopify plan.
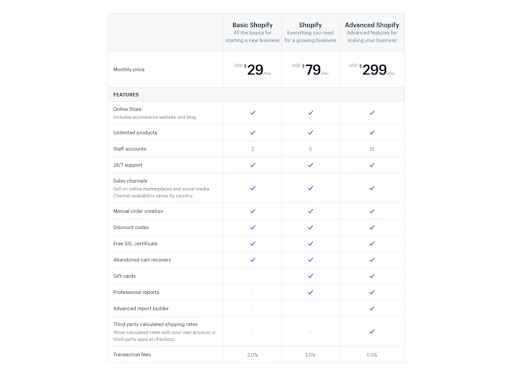
As you’re only just starting out, the Basic Shopify plan should be enough for your purposes: you can always upgrade later, once your store has grown!
And just like that, you’re now the owner of a store that’s open for business. Congratulations!
Here are a few miscellaneous store-related tips:- For POD/dropshipping products, you will automatically get a photo of each product from your service provider. For the other business models, it’ll be your responsibility to take attractive and high-quality photos of your products. Here’s a handy guide to apparel photography to help you get started.
- For POD/dropshipping products, if you don’t like the default product photos that you get and would like something more exciting, you should check out PlaceIt; it allows you to seamlessly superimpose your designs on the t-shirts of real-life people doing real-life things, making your products seem much more relatable.
- You might want to consider using some fashion-related Shopify apps, such as ones that allow you to add size charts and let your customers zoom in on product images.
5. Market your store
Now, understandably, simply launching your store isn’t going to be enough to start bringing in some customers. For that, you’ll need to start getting the word out about your store. In the world of ecommerce, there are certain standard marketing practices that everybody learns to adopt quite early on. These include:-
Social Media Marketing
Very simply put, this involves presenting content about your products in a strategic manner to the right kinds of audiences on social media platforms. This is completely free of cost, and can result in big dividends over time. Here’s a guide to creating a social media strategy for your store.
-
SEO + CRO
SEO (Search Engine Optimisation) is a set of techniques designed to improve your store’s ranking in the results of search engines such as Google. In other words, if your store has good SEO, somebody looking for the kinds of products you sell is likely to see your store’s name pretty high up in the list of results. Here’s a brief video course designed to provide SEO training for beginners. CRO (Conversion Rate Optimisation), on the other hand, is a set of techniques designed, as the name suggests, to maximise the chances of a visitor to your store actually buying something. For instance, one way to do this is by incentivising customers to review your store, rate it, and refer it to their friends and family, or to make a repeat purchase. There are several Shopify apps that can help you improve your conversion rate: you might want to consider using some of them once your store has hit certain milestones.
-
Online ads
You can put up paid ads of your store and products on various platforms, such as Google, Facebook, Instagram, YouTube, and Reddit. These ads are often targeted towards people who are likely to respond favourably to what you have to offer, and can be a good way to get the ball rolling on your sales.
Given the extremely competitive ecommerce landscape that currently exists, to really put your products on the map and help them stand out, you’ll need to look beyond these standard practices, and venture outside of the digital realm. For instance, it could be a good idea to book a stall at a local pop-up flea market or fair. You could even try to work out a deal with some relevant local businesses: for instance, if you sell printed t-shirts themed around music, you could have a local music store showcase your t-shirts in exchange for a cut. Bottom line: you should consider everything that could help get the word out about your store and products, and eventually drive your online traffic up.
Examples of Indian clothing stores
-
Brick by Brick
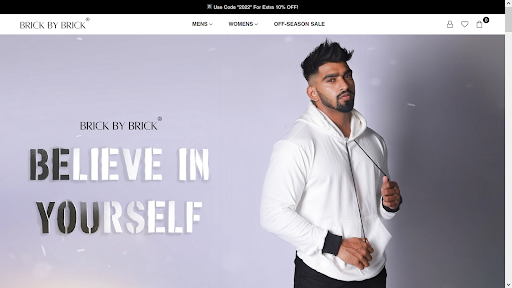
Brick by Brick focuses on gymwear and activewear, and has an unpretentious store with good photos and a reviews section brimming with praise for its products. A solid, no-frills approach to a simple yet essential product: many stores could benefit by taking a leaf out of this brand’s book.
-
Yacxilan Artwear
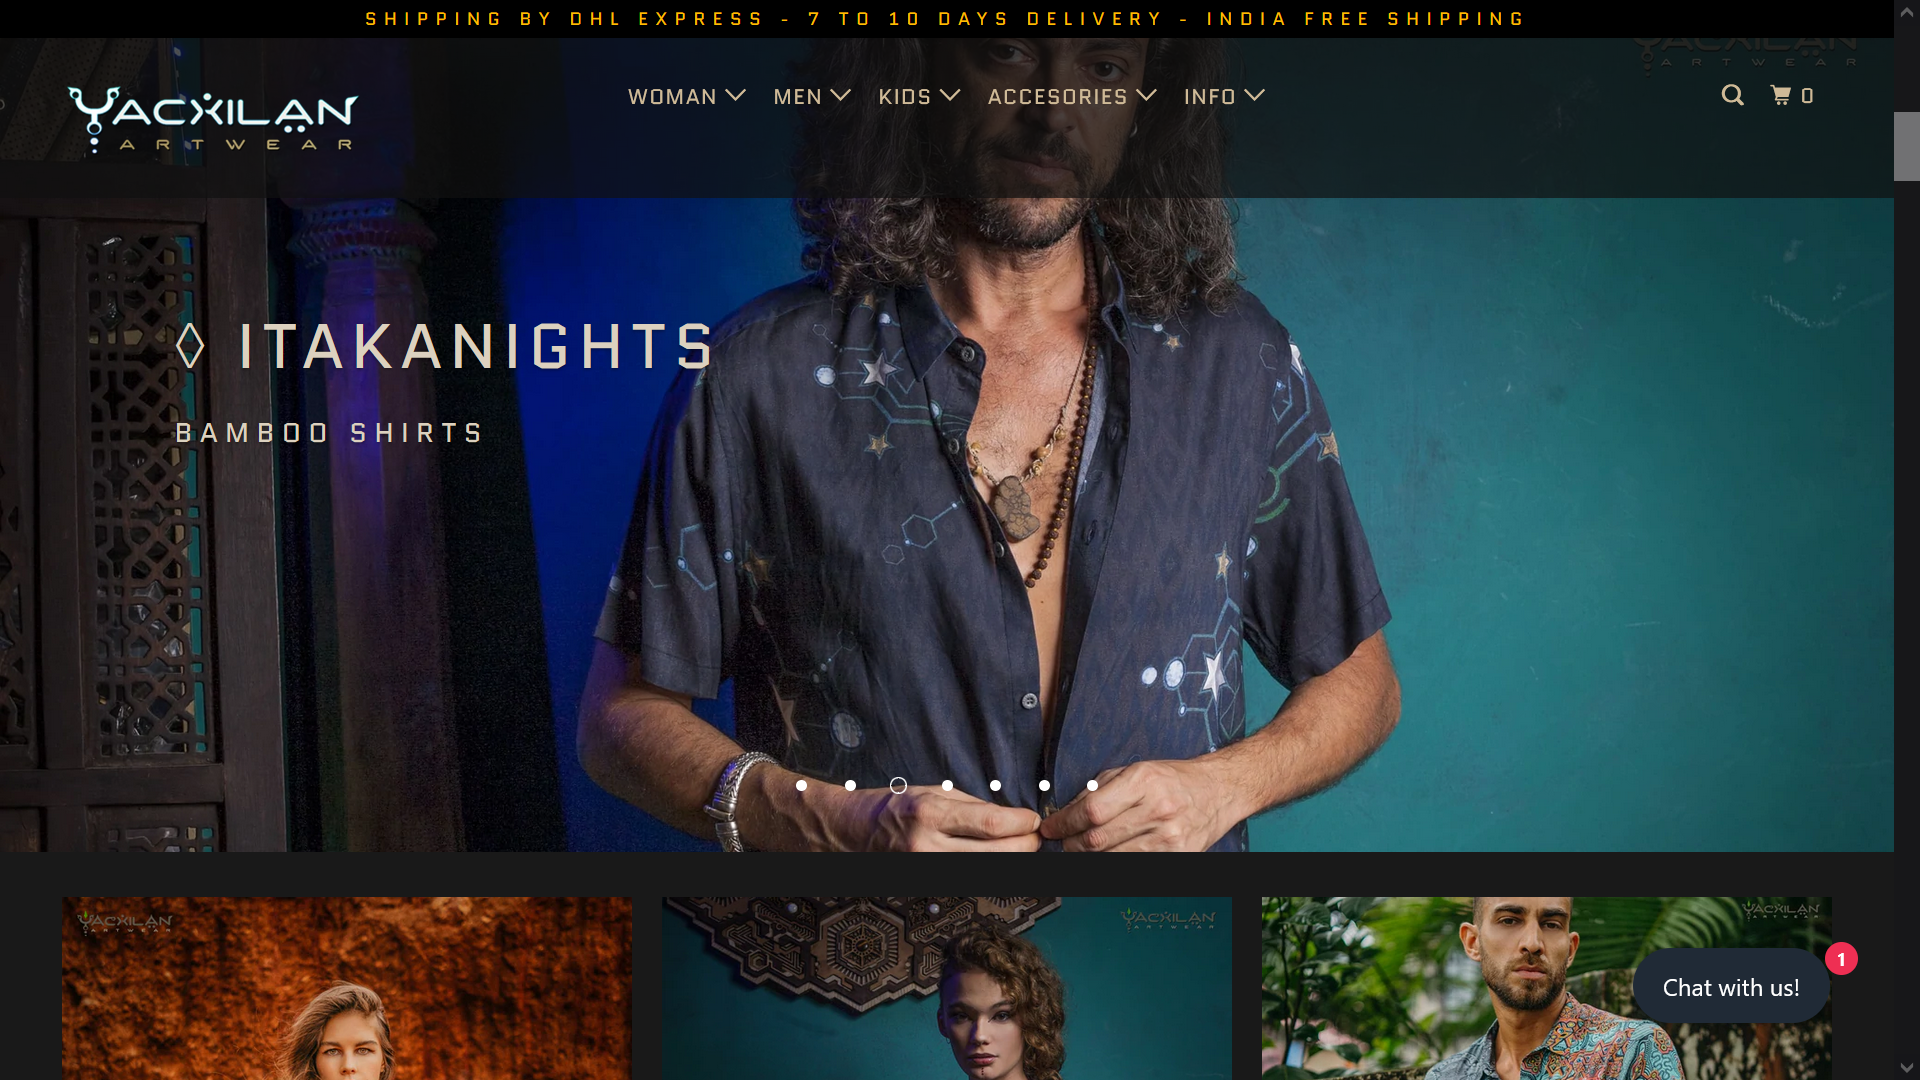
Yacxilan Artwear is a zany and off-beat apparel brand based out of Goa that sells everything from swimsuits to kimonos. The photography in their store is an absolute joy to behold, and their designs certainly look like they’re made individually rather than being mass-produced.
-
Oziss
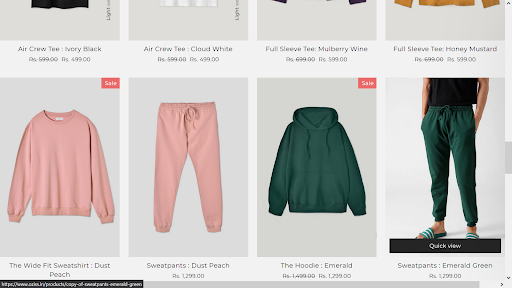
Oziss has built its brand around a powerful niche that attracts a lot of strongly committed people: environmental sustainability. It claims to be India’s first carbon-negative clothing essentials brand, and its store features reasonably priced t-shirts, sweatpants, and hoodies with extremely functional photography. Given the worthy cause it champions and the comfortable-looking products it offers, who could turn away from this store without taking their wallet out?
Apparel online: infinite variety, infinite potential
Clothing and apparel remain extremely popular products to sell online. There was a time when someone without design skills would probably have had to spend a small fortune hiring designers to create potentially profitable clothing to sell online. But now, with the lethal combination of print-on-demand, inexpensive freelance designers, and online stores, just about anyone with grit and a vision can start an online clothing store and develop it into a brand.
FAQs
1. How do I start my own online clothing store?
There are many online platforms, such as Shopify, where you can create your own store in a relatively straightforward manner and stock almost any kind of product you want, including clothing. Here’s a simple summary of the steps to set up your own Shopify store:
- Create a Shopify account and select a name for your store.
- Customise the appearance of your store.
- Add products by providing their names, descriptions, images, etc., or by “pushing” them from a third-party platform where you’ve already created your products (such as print-on-demand providers).
- Draft your store’s policies.
- Add payment providers.
- Add a delivery partner, if needed.
- Lastly, sign up for a Shopify plan so that your store can go live.
2. How much does it cost to open an online clothing store?
It depends on your business model, the platform your store is built on, whether or not you’re putting out paid ads, etc. In principle, with a store built on the free tier of a platform that sells products through dropshipping and carries out no paid advertising, you wouldn’t have to spend anything at all to keep your store going. More realistically, however, it would be wise to provision anything between INR 10,000 and INR 1,00,000 for the first few months of your business. If you’ll need to buy a fair amount of inventory in advance, you might need to start with an even bigger amount.
3. How can I promote my online clothing business?
There are several ways to promote your online clothing business, including:
- Social media marketing
- Paid ads on Google, Facebook, Instagram, YouTube, Reddit, etc.
- Organic traffic through Search Engine Optimisation (SEO)
- Offline events, fairs, flea markets, etc.
4. How do I start a t-shirt brand in India?
A relatively simple and low-cost method to start a t-shirt brand in India is to use the services of a print-on-demand (POD) provider. This will enable you to sell t-shirts without having to hold any inventory. You will then have to decide which niche you’d like to cater to, create an online store where customers can come and buy your products, and then market your brand and your products through various online and offline channels.
A relatively simple and low-cost method to start a t-shirt brand in India is to use the services of a print-on-demand (POD) provider. This will enable you to sell t-shirts without having to hold any inventory. You will then have to decide which niche you’d like to cater to, create an online store where customers can come and buy your products, and then market your brand and your products through various online and offline channels.


